Chapter Fourteen: Time-Based Editing

Video editing is the process of arranging media into a linear form in order to communicate a message. I found it interesting to learn that video footage used to be edited by hand using a hand device, in which the film was cut into sections with a razor blade tool and then spliced together using clear tape! I never knew this before. Machine-to-machine editing was also an intriguing topic to learn. It involved a playback deck, a source monitor, a record deck, a program monitor, and en edit controller.

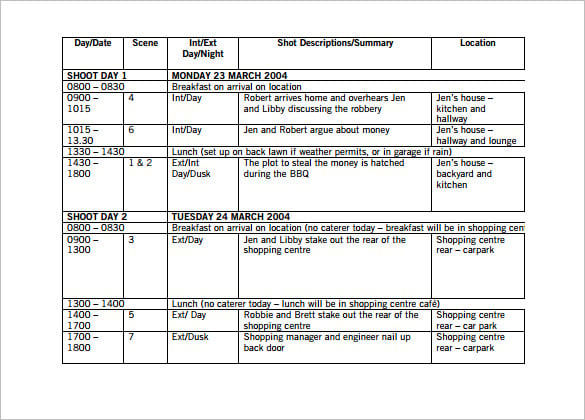
Videos are edited electronically, as are film, using software programs such as Final Cut Pro, Avid Media Composer, or Adobe Premiere Pro, according to the chapter. During the production phase raw footage can be filmed and a written script can be planned before hand for films, newscasts, commercials, or other videos. A teleprompter can be used to feed words to the person that is talking on camera, so that they don’t forget what they are supposed to say or mess up in front of a live audience. This is another instance when it is important to PLAN PLAN PLAN beforehand, so that scripts or a teleprompter can be ready in advance. Below is an example of a video being edited in a program, as well as a teleprompter.

Related image

Related image


Sound bites are constructed by editors and can be short or longer clips of audio, according to the chapter. The clips can also be combined or divided in half if the sound bites are too long. The average length is 10 seconds and they should be kept UNDER 20 seconds so that they do not take up too much time and become distracting. B-roll on the other hand, is video footage that is used in conjunction with spoken audio. Natural sound, like the word suggests, is sound that comes along with shooting b-roll, and it can be sounds that occur in nature, such as grass being cut or birds chirping. A voiceover is a narrative that guides the audience over the visual portion of a video. Graphics or sound effects can also be added to supplement on-screen material.

Designing graphics for television can be tricky because the designer has to keep in mind the amount of time that it takes to read or view text on a screen, as well as how long the images will be on the screen, which will only be a few seconds. So, they must be easy to read, have solid colors, large font, be legible, and uncluttered. When considering continuity editing, the edits must be seamless so that they are not visible to the audience, which can ruin a scene. Cutins are a technique in which the viewer’s eye is drawn to a different view within a scene. This is done to make the viewer feel as if they are looking at things with their own eyes. Another technique is called cutting on action, which is when the editor matches continuous action during a scene to two sequential shots. For example, a wide angle shot of someone performing an action can be cut to a close-up shot.

Once the production has been finished, it is crucial to organize and store the footage in the proper place for ease of access. Creating a master project folder is the easiest way to contain all of the files that are with the project, and then you can also make other subfolders for the images, sound, and video. Media files are the files that are waiting to be edited, and high definition files require a lot of storage space, which may require hard drives that are able to store large amounts of data. In logging and batch capturing, the editor works with the clips that were captured and then logs them based on the scene, camera angle, location, or take number. Rendering a file is when the editing software makes new files for video after things have been placed by the editor, such as transitions, filters, or titles. Rending files can be done at the end, according to the book, or they can be rendered as the editor works.

A timeline displays all of the video clips on the editing software and they are ordered in linear regions which are called the tracks. Compositing a video is when two or more tracks are combined to form one image. The frames of the video are denoted by timecode. The example from the chapter is 01:18:54:27, which means a frame location of 1 hour, 18 minutes, 54 seconds, and 27 frames. You can also transform videos within the frame with the wire-frame, which allows you to rotate an image, change the speed, or add a filter. There are many different techniques to add clips to a timeline.

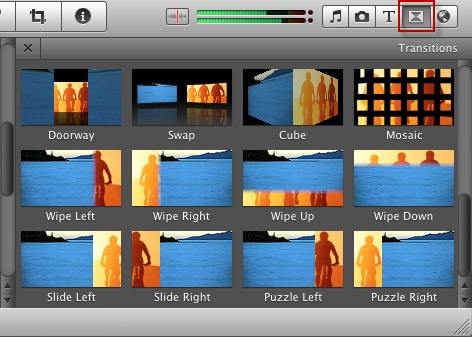
Transitions can be used to make the content flow. Cuts, fades, and dissolves are different types of transitions. A wipe is an effect that uses linear movement to transition from one image to another image, and transitions can be customized depending on the project. BUT, it is important to keep in mind the duration of the transition so that it does not take up too much of the project.

Image result for video transitions

Once all of the clips are in the editing software, you can go through them in a series of passes. The first pass is when the spoken words are added, so this is when the editor would inset sound bites, voice-overs, or recorded narration. The second pass is when b-roll and natural sound can be added. Titles and graphics can be added in the third pass, sound effects and music in the fourth pass, transitions in the fifth pass, and the sixth pass would be making finishing touches. Three-point editing is also detailed within the chapter: 1. Set an IN and OUT point. 2. SET an IN point in the Timeline. 3. Perform the Edit. 4. Repeat steps 1-3 for SOT 2 and VO2. The last step is 5: Add B-roll over VO segments. Keeping in mind these steps in order is extremely helpful for editing the footage, and it is extremely important to go through every aspect with a fine-tooth comb to make sure that everything has been added correctly.

Image result for video production crew


Chapter Thirteen: Video Production

Image result for video production

The first thing that I learned from this chapter is that there is a technical difference between film and video. I did not know this before. Historically, film was connected to photography, according to the chapter, and video was connected to television. When I think of the word film I automatically see a recording device making a film, so now I realize that the term film was what was used inside of a camera to capture images, and this is why the word was rooted in photography. To further explain what is in the chapter, movies were captured on film, while television content was captured on videotape.

Production is the main topic of this chapter, and when someone is producing something, it means that they are physically capturing or creating it. The point of view is where the camera is in relation to the subject that is being captured, and a viewfinder is on a video camera to show you where to position your eye to capture video. The photographer will monitor the field of view using the viewfinder, all while considering proper angles, lighting, location of the subject, and any objects that are in the field of view. The camera angle is important because the camera is an extension of the human eye, according to the chapter, so the person capturing the video needs to keep in mind that the recording should be giving the viewer a sense that it is coming from their (the viewer’s) perspective. Low angle shots are when the camera is put below the subjects eye-line, and high-angle shots are when the camera is placed above the subjects eye-line.

The z-axis is the third dimension of human vision, and it is in the direct line of sight. Therefore, when we capture interviews on film, subjects cam be placed six to eight feet away in order to extend the z-axis to appeal to the viewer’s eye. Focal length can also be set by using the lens to determine which areas of a room should be included in the field of view and what should be left out. A good tip is to not use spaces that are cramped or cluttered, because they will come across to the viewer as being cramped and cluttered as well, which is not visually appealing.

Image result for interview

The frame is defined as a single still image, and video is usually taken at 24 frames per second, which is denoted as (fps). The frames are captured separately and then shown rapidly. I did not know this prior but it made me want to learn more. Freeze frames can occur over a span of time, and a shot is when an image that is live is taken from a cameras point of view over a specific amount of time. Next, a take is a single recorded instance of a particular shot (415), and the director can sort out good takes and bad takes. A scene is when an event is filmed in a location over a period of time and a sequence is a series of shots that have been edited that have a continuous flow. It is a mini-story. Below is an example of a production schedule:

Image result for movie production schedule

A wide shot is a wide angle view of a scene. A medium shot is closer and only of a portion. A close up can be normally close or extremely close to the subject. Lead room is white space between the person and the edge of the frame, and headroom is the white space that is above the persons head that extends to the top edge of the frame. Primary motion is the movement of people, animals, or objects, while secondary motion refers to the motion of the camera moving, panning, or zooming in on a subject.

A tripod helps tremendously with recording, and I can attest to this from the activity that we did in class when we shot videos. I also enjoyed reading about how important the lighting is when shooting video, and that the light can be modified by using flags which block unwanted light, scrims which diffuse hard light, or reflectors which redirect light. There are also different types of bulbs, such as incandescent lights which generate a lot of heat, plus fluorescent or LED lamps.

Knowing the proper lighting and set-up for a scene can really show the difference between an amateur and professional, and after reading this chapter whenever I want to record any memories I will definitely be contacting a professional that understands all of the proper techniques of video production, now that I have a better understanding of the hard work that goes into it!

Image result for video production

Chapter Twelve: Audio Production

Image result for sound

Sound can be what we hear inside or outside, in a large or small environment, or it can be what we hear from radio stations, podcasts, or songs. For sporting games that are televised on television, it is often enjoyable to be able to hear the sound of the ball dribbling on the court or the sound of a bat hitting a baseball. Sound is formally defined as a phenomenon that occurs naturally, that involves pressures and vibration. This chapter emphasizes that learning and understanding how sound works will aid in creating better sound quality for content. Sound waves are generated through energy and can travel through solids, liquids, or gases.

Related image

Amplitude is defined as the sound wave’s height, and amplitude indicates the intensity of the wave, and it is measured from the crest of the wave to the trough. It is measured in decibels that quantify the sound pressure level, which is denoted as SPL. The level that causes pain in the ear starts at 140 decibels, and repeated exposure to this level of loud sound can lead to ear damage and ultimately hearing loss. I realized while reading this Image result for amplitude

that my music is most likely too loud in my earphones or in the car. My 16th birthday gift was extra 12-inch speakers for my car, and perhaps it is time to retire these so that I do not get hearing loss from listening to music so loud.

Frequency is a sound’s low or high pitch and people can hear frequencies starting at 20 Hz, up to 20,000 Hz. The range is divided into subgroups denoted as bass, midrange, and treble. Microphones are used to record sound waves and they convert the sound waves into electronic format. Then, the sound can be transmitted and played out loud. There are different types of microphones. Dynamic types use acoustical energy and don’t require a power source, while movingcoil microphones are attached to a coil that works with a magnet to submit current to the microphone chord. Plus, microphones can be omnidirectional, which means that there is a sphere around the microphone which picks up sound from all directions. Or, they can be bidirectional, which means that the sound is picked up equally from the front and the back.

Related image

The common microphone styles, according to the chapter, are handheld, lavalier, shotgun, and boundary. Lavalier microphones are designed to be used with no hands. It is also important to place the microphone in the right place to capture the optimal sound quality. Handheld microphones may have a windscreen which helps to decrease unwanted noise when outside. Microphones can be builtin or external. Computers have built-in microphones, which, according to the chapter, are used for speaking or having conversations, and not for recording audio. I have worked with wireless microphones before, and these are the most common that we see performers and entertainers use on a stage.

Audio connectors are used to connect microphones and audio device. A balanced cable microphone is equipped with three wires that send information back and forth in a continuous loop. There are also adaptors, which can be used to hook cables up to incompatible connectors. It is important to learn how to manage all of the cables so as to not feel overwhelmed or trip over cables while out in public. Sound checks are also a part of this, and audio will sound professional if the proper steps are taken so that the sound quality is adjusted as necessary when conducting an interview, for example. Having a good set of headphones is important as well so that capturing audio is done without making mistakes and errors. From this chapter, I learned that having the proper equipment throughout every stage and knowing how to use it is key to having successful audio production!


Chapter Eleven: Recording Formats and Device Settings

Related image

Learning how to operate a digital audio recorder or camcorder in order to interview people or take videos of events is important. I was surprised to learn that recording technology came after live broadcasts, as I did not know that live broadcasts were done first out of necessity. I thought that shows broadcasted live in order to intrigue the audience, and I learned from the chapter that video technology was not developed until after people realized that television could be a valuable thing. The first tape delayed show that was recorded was The Bing Crosby Show, which, according to the chapter, was the first tape-delayed broadcast that was released in the entire country!

The first videotape recorder that was for commercial use was released at the National Association of Radio and Television Broadcasters’ Convention in 1956. Videotapes are composed of regions that are divided into separate parts. The video track stores the picture part of a program. The audio tracks are for audio. The control track is in charge of advancing each frame of film to the next frame, because video is constantly moving.

The 1970s gave us our beloved VHS tapes, which were in the analog format. As technology progressed into the 1980s, things started to be recorded digitally. The 1990s brought HD formats. Technology is still progressing, and now we have tapeless technology in which videos can be saved to solid state drives or flash drives. Encoding is a method that software uses to numerically convert multimedia into binary form. When sound is plugged into a computer, it has to convert into a digital form, and Pulse-code modulation is used to record audio as binary data. I found this interesting to learn as I did not know this prior. Audio sample rates are measured in Kilohertz, and a 50 kHz sample rate would mean that the recording was sampled at a rate of 50,000 times per second. Sample rate also impacts the frequency response of digital recordings. Bit depth on the other hand, impacts the amount of noise and distortion in the noise of a recording. Conversely, bit rate concerns the speed of an audio stream when the sound is being played back.

Image result for cd player

Open standards are rules that companies follow when publicly releasing the design of certain products. This is very important because if we did not have these sets of standards, according to the book, we would have to carry around an adaptor to use common household electronics! MP3 was developed in 1993, and thanks to this we are able to store music files digitally on a device. I remember my first iPod well, and never called it an MP3 player like my other family members. Below is an example of an MP3 player:

Image result for mp3 player 
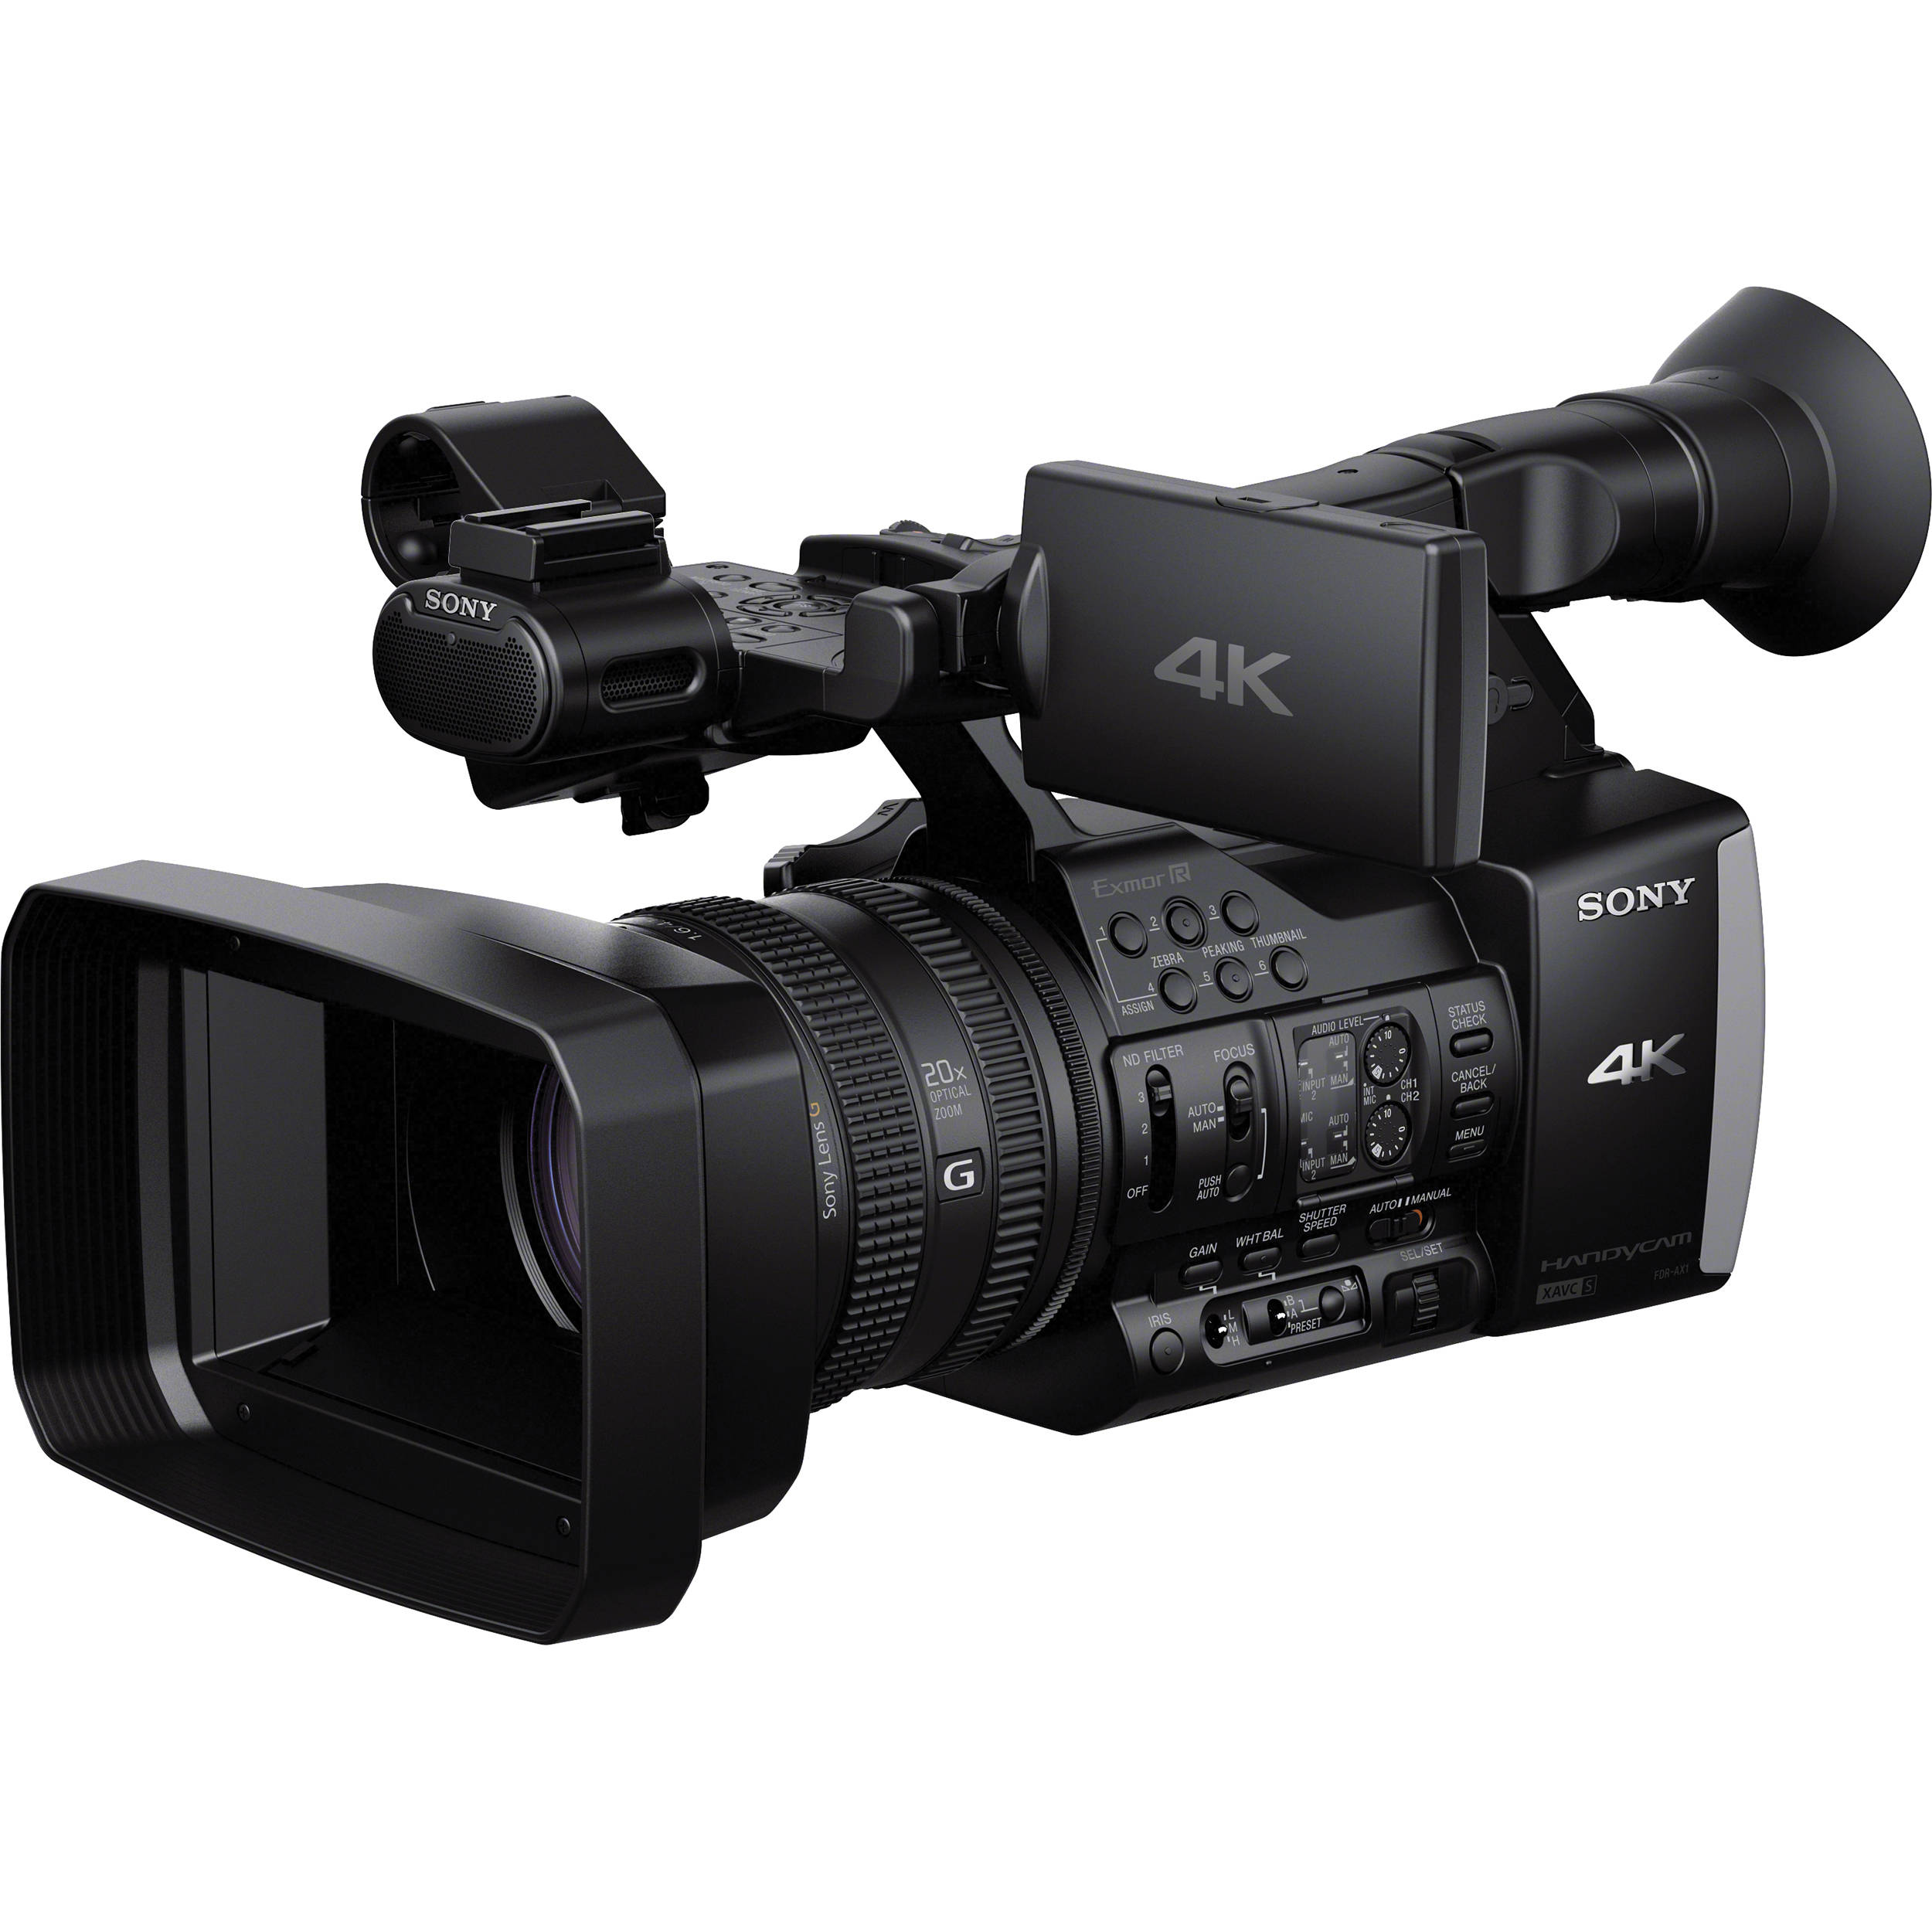
Audio compression was enhanced through MPE-2, and MPEG-4 are recent standards that determine compression. MPEG-4 also allowed us to develop a universal format for encoding HD video on digital recorders, and for when we went to share a video online to YouTube or other video sharing websites. Plus, we also have high efficiency coding H.265, and we can use this for high definition videos. An impressive camera that was developed by Sony in the early 2000s was the XDCAM which could store up to 50GB of data. The SxS camera was developed in 2007, and now most of the Sony cameras use SxS media for recording. RED digital cameras use solid state drives to store up to 4K of recordings, and AVCHD is a format that was released by Panasonic and Sony that lets the camera user set the video quality.

There are many different ways to transfer and store files, which are important when saving the film or memories that have been recorded. Memory cards or Memory Sticks can be used or removed, or an SD card can be used. Digital cameras and audio recorders also have settings that the user can use to program certain functions and settings. Video encoding settings can also be changed by the user, and you can also change the resolution, scanning method, frame rate, and the bit rate as well. Autofocus and zooming are other popular features on cameras that make them easier to use. The FWIGSS can help people remember basic camera functions: Focus, White Balance, Iris, Gain, Shutter Speed, and Sound. I also found it interesting to learn that some cameras have what is called a Zebra feature, which display lines across an image to help adjust the iris. Once the iris is adjusted properly, the zebra stripes will almost disappear, which means that the image has been set to the proper exposure.

Image result for camera zebra feature

Camcorders come with a built in microphone which can be used for recording the natural sounds in an indoor or outdoor environment. External microphones can be connected and are great for conducting interviews. The chapter is helpful to learn how to connect an external microphone and set it up properly for optimal sound. All of these different aspects of recording formats are beneficial to know, and it is also good to know how to change the different settings on a device!

Chapter Ten: Photography

Image result for photography

Photography is the process of fixing an image in time through the action of light (293). When photography is digital, the images are instantaneous. Traditionally, photos were chemically processed and created through the use of exposing the images on the film to light. Digital cameras became the primary way to take photos in the last twenty years, and there are different types of cameras available for consumers, prosumers, and professionals. The distinction means that the types are rated by low medium and high depending on the type of equipment and the type of user. It was also interesting yet sad to read that the well-known Kodak company field for bankruptcy in 2012 due to the decline in people acquiring and using photographic film.

Consumer cameras are at the low end of the spectrum and are designed for people that do not have a professional background in photography. Called point-and-shoot cameras, these tailor focus and exposure setting automatically for the user. Most of the functions of the camera can be accessed by the menu, and they are very easy to learn and use. Others are called DSLR cameras, and these direct an image to focus while the viewer is looking through a lens.

The term “prosumer camera” are the terms professional and consumer blended together. These types of cameras are typically tailored for people who have more experience than the average consumer but less expertise than the professional user. These cameras are DSLRs and it is easy to control the exposure. Plus, these cameras have interchangeable lenses and are easy to use and navigate. Professional level cameras have all of these same features and more, and have a better quality of lens. Video cameras also share in some of the controls and modes as photo cameras.

DSLR cameras have what are called imaging chains, which have four different parts: the lens, the iris, the shutter, and the image sensor. The image below is similar to the one that was provided in the book, and it explains that the lens focuses on what the camera sees and the iris regulates exposure. The shutter is in charge of the time of exposure and the image sensor is what captures light.

Image result for four major parts of dslr camera

To further explain, lenses can be prime lenses, which can be wide-angle or telephoto. Wide-angle lenses have a short focal length and give a wide angle of a view. Telephoto lenses have a long focal length which gives a narrow angle of a view. On the other hand, normal lenses have a medium focal length. One type that I found interesting is the fish eye lens, which can make the view 180 degrees. It is interesting to see a video that is filmed with a fish eye lens. The iris is in charge of regulating the amount of light that hits an image sensor, which is a small chip that registers electronically the amount and intensity of color and light that is coming into the camera. According to the chapter, exposure is what creates the image because it exposes the image sensor to the light. It then depends on the intensity of the light, which is determined by the iris, and the duration that the light is in contact with the image sensor. Exposure can be calculated by multiplying the intensity by the time, and cameras have a built in meter for exposure,

Image result for exposure

The image resolution depends on the pixels that the image sensor produces, and options of these different parts of a camera can vary depending on the company by which the camera was produced. The exposure triangle is interesting, as it is used to determine the components that a photographer needs to adjust on the camera in the areas of aperture, form speed, or shutter speed. All of these work together so when the photographer changes one she or he must also change the other.

Image result for exposure

White balance can be set on a camera by shooting a white object and pressing the white balance button. This is done so that the light source that the electronic sensors in the camera are exposed to capture the accurate color of objects. Setting a camera to auto-white balance is an easy way to make sure that this is set on a camera. The camera can also be focused so that the objects that the photographer is shooting are sharp and clear.

The depth of field is the area that is in front of and behind the main subject of the photograph. Portrait mode is another intriguing thing in this chapter, as the camera on my phone has this option. Portrait mode is when the controls of the camera are optimized to shoot close-up images. This is a really popular option for people to easily shoot pictures that look somewhat nicer than regular ones that are taken on a cell phone. I also enjoyed reading about the different ways that cameras can be kept stable, which is through tripods, monopods, or other methods that decrease the shakiness of the camera.

Solid state memory cards can be used to store the photographs that are taken on a camera, and images can also be downloaded to computers and then edited using different software programs. This, along with USB ports, make transferring, storing, and putting images into folders easy. All of these different aspects of photography make using a camera and then editing images easier and more enjoyable. After all, capturing memories is what photography is all about!

Image result for digital camera

Chapter Nine: Graphics

Image result for graphics

Graphics are visuals that can be displayed on a physical surface. Examples of where you see graphics are on computers, on paper, on walls, on posters, on billboards, and on flyers. Graphics can be created by hand or they can be created using software on a computer. Logos, illustrations, drawings, figures, and symbols are all examples of things that graphic designers could create to use in print of electronic form.

Images can be two-dimensional or three-dimensional representations of people, animals, objects, forms, or other images. According to the chapter, images can be still, which include photographs, maps, or charts, or images can be moving, which include videos. Digital images can be used to record scenes and graphics are reduced to a number so that the image can be altered on a computer.

Raster Images are created when an image is divided into rectangles that are made up of pixels, which are square areas of light representing points. Thousands of points are arranged to form the entire image. Some important characteristics of raster images to consider are resolution, which is used to determine the image quality. The resolution applies to the size of the pixels and the amount that are used to make up the picture. The more pixels, the higher the image’s resolution will be.

Pixel dimensions can be explained like this: (800 x 600). According to the chapter, this means that there are 800 pixels across the image from the left to the right and 600 pixels across the top to the bottom. To determine the pixel count, you multiply the horizontal and vertical dimensions. When considering the pixel density, the rule is that the more pixels per inch, the smaller each individual pixel will be. When scaling an image to adjust the edges, you must take into account that raster images are resolution depending, so they have a fixed number of pixels. Thus, when you are scaling the image, you can ruin it if you do not redefine the structure and pixel count. Resampling changes the size of an image through changing the pixel count, which can be increased or decreased, and anti-aliasing smoothes out the edges of a raster image. Lastly, raster images can be saved in different formats depending on preference: GIF offers 256 colors of transparent pixels, JPEG offers 16.8 million colors but no transparency, and PNG offers 16.8 million colors and transparency.

Vector Images form a picture using paths that are composed of points, lines, curves, and shapes. Images in this form can be scaled without losing the clarity of the picture, and lines are usually sharp and crisp. Plus, aligning the photo is easy because the picture is not composed of thousands of little pixels.

Image result for raster image

Tv’s, smartphones, and computers all have a fixed number of pixels, which is called the native resolution. The display settings can be changed for visually impaired people or for people who prefer the size of text to be larger. Interpolation is when a computer generates values for each of the pixels so that the image is scaled to fill a larger space. Aspect ratio, according to the chapter, indicates the proportion of the relationship of the width and height of the screen and is indicated as x;y. 4:3 and 16:9 are the most common.

Moving images can be found in TV, computers, games, cell phones, and navigation systems. Raster scanning is when the images are scanned and reproduced on the screen. Progressive scanning is when the lines are scanned from top to bottom, and interlaced scanning is when the frame of the image is captured into two separate parts and transmitted as such. Odd lines are scanned first and even lines are scanned second.

I found it interesting to learn about television and cinema standards. Digital television, known as DTV, offers advantages because the content that is created for it is more fluid and can be easily distributed. Plus, it also gives the option of using the 16:9 format and high definition, which makes the content very high quality. I also was intrigued to learn that Raleigh’s very own WRAL was the first television station in the country to broadcast using high-definition signals. The Digital Cinema Initiatives standardized the specifications for digital production for movies in theaters, which I did not know prior to this chapter. All of these different facets of creating graphics are important to consider when creating content and images that are of the highest quality.

Image result for digital television

Chapter Eight: Text

Text is the visual representation of thoughts that are expressed through the human language. Ways in which we use text are: mobile texting, emailing, snail mail, and Tweeting. One of my favorite ways to manipulate text is to change the font of a document that I have written for fun to cursive or otherwise silly text to see how it looks. This leads into the topic of type, which is defined in the chapter as being the character that is created to communicate written information.

Letterform applies to letters and characters, and typography is the practice of creating and arranging type. Fonts and typeface are different, because typeface concerns the design, while font concerns executing the design in a certain size. The appearance of typeface should be unified, while font concerns the style and size of the words on the page. The book explains that Times New Roman is a typeface, while Postscript 12-point Times New Roman is a font. Fonts are arranged into font families, which include all of the styles of a specific typeface.

image_6bacce7a-e46e-4a17-b4c2-d09c5a4f4330_grande

Snail-mail

Johannes Gutenberg is credited for inventing movable type, which had to be arranged by hand by the user. The type was organized into horizontal rows and ink would be applied to transfer the text to a piece of paper. However, this very time-consuming, and thankfully we now have electronic and digital type that can be chosen by the user based on the chosen or intended aesthetic.

Image result for different word document fonts

It is also important to consider legibility and readability. Legibility are the characteristics of the typeface and readability is how easy the text is to read once it has been typed. There are other aspects of typography as well, such as stroke, contrast, and stress of the text. Stroke is noticeable in curved letters, and it is when a pen moves horizontally, vertically, curved, or diagonally. The change between thick strokes is called the contrast, and stress is the location of the transition in the letter from thin to thick lines. Other characteristics are when the text is made bold or italic, and the proportions of text should be taken into a account for readability as well. When text is made bold, the thickness is adjusted to match the increase in the stroke thickness. Italic typefaces are intended to make the text look handwritten. Serifs are decorative accents that are added to the end of a stroke, according to the chapter, and can make the text look more visually appealing or interesting.

Image result for serifs

Sans serif typefaces are designed without serifs. This type is ideal for title headings, and are best when designing webpages or other electronic mediums, which I did not know. Keeping this in mind is important for creating websites and webpages so that the text appears uniform on the page. You can also chose between decorative typefaces or script typefaces. Script typefaces are slanted and look similar to cursive writing.

Image result for script typeface

The keyboard also has the capability to insert special characters such as the ones below:

Image result for special characters

You can customize the font style, strike through certain words, put things in capital letters, and emphasize certain words using the Bold and Italic settings. True font styles are when the designer changed certain aspects of the text while designing it, and faux font styles are computer generated. Changing the font size can also be done to subheadings to emphasize certain images on a page. Plus, underlining can be used to emphasize words of phrases as well. You can also customize font color, and highlight certain words on the page. Superscript characters are smaller characters that are above a letter and subscript characters located are below the characters:

Image result for subscript vs superscript

Leading is the amount of space that is between lines of text that are vertically adjacent, and lines must be placed strategically together so that they are not too far apart or too far together. It is also necessary to consider alignment, justification, and distribution when aligning the text on a page. Distribution is when you make sure that the page is equally distributed from each corner, and when the page is aligned equally the page is justified. All of these must be precisely done to scale so that the text is visually accurate on a page, and a tip is to use a grid to map out where the text is going to go. According to the chapter, grids can be accessed through software programs, and grids make aligning text efficient and accurate.

Text can also be altered to make it more visually appealing and interesting, which is called font transforming. An example of this is warping, which is when typeface is distorted or manipulated to create variety. Another example is stroke, which is when colored outlines are added to type to add variety and interest. One thing to keep in mind for this chapter is that less is always more, and making sure that the text is not too overdone or silly looking is important to having text that communicates ideas effectively to the intended audience. All of these aspects of text are interesting to consider, and must be taken into account when designing webpages and other forms of media.

Chapter Seven: Web Design

Image result for www

Thanks to search engines, such as Google, I no longer type in www. before searching for anything on the Internet. We have Tim Berners Lee to thank for inventing the Internet, which is the network(s) through which computers communicate. HTML5 is one of the main topics of this chapter, which is a system in which web pages are built. HTML files are text files that can be typed and created in basic software such as Microsoft Word. Code is the set of instructions for the computer that are written out. Leaning how to write code is important for working with websites and HTML can be used to label parts of a document, and it also lets you put tags around a document so that it is displayed a certain way on the screen. Other things that can be created are building blocks, lists, tables, and you can also italicize and bold text. Examples of this are <div> which means division of the page, <table> which means table, and <style> which controls the style of a section of a page.

Image result for html

Next, when you are creating web pages, you also need to consider how the page will look in the browser, as certain browsers may display the information differently. HTML can be interpreted different in certain browsers, according to the chapter, which will result in the code not being interpreted how it was intended to. The chapter also explains that browsers use plug-ins to display information that is not in HTML form, such as videos. Also, you need to make sure that the code is written properly so that users on mobile phones can view that material and not just designed for a desktop computer. Domain names include protocols, which are the set of rules that control how the data is exchanged on a network. Furthermore, there are domain names of servers and server names can be broken down:

Image result for anatomy of a url

You can also choose a fun domain name! Sites are created on the computer and then transferred to the server, which gives you an chance to preview the site, keep a backup copy, and have it stored in case the site ever crashes. While setting a webpage  up, setting up a root folder is key so that you have somewhere to store the files. Planning is also essential in web design as well, as it is necessary to plan how many links that are going to be on a website, how many clicks it will take users to reach their destination, and you also want the page design to be usable and easy to navigate. A good tip is to try and assemble the information so that it can be reached in the fewest amount of clicks possible, to make it easier for users. Text must also be labeled, according to the book, so that the browser puts spaces between your paragraphs and other headings.

The site also needs to be uniform and consistent! Users will click away from a website that is unorganized and inconsistent throughout. This is another example of when I think having good planning is important so as to maximize space and minimize errors. Major sections, headings, paragraphs, block quotes, and lists are all ways to structure text and make sure that it has spaces in between. Links can be added to websites as well which can link to files in your website and images can be linked to as well. Margins, fonts, colors, and adding interactive multimedia content are all ways in which to change the characteristics of the appearance for a webpage and make it more user friendly and easier to navigate.

Accessibility is also an important aspect of writing code and designing a webpage. It is important to make the information accessible for all users, and you also need to consider who the primary audience of the information is. Some users may be colorblind, and others may not be able to read small print. Adjustments may need to be made for disabled users, and you can use WYSIWYG tools to do a scan of errors and run an accessibility report. Programs such as AChecker will perform the same function as well. Once the site has been checked for accessibility and approved for both desktop and mobile devices, it can be uploaded to the server, AS LONG AS it has been checked, double-checked, proofread, and re-checked again! After it has been published, you will also need to take these same steps to make sure that it has been uploaded properly, that all of the information is placed correctly, and that it is accessible for all users. All of these aspects of web design in this chapter and extremely important for creating a good webpage.

Image result for proofread

Chapter Six: Using Interface Design

When beginning this chapter, I was unsure as to what User Interface was. It is defined in the book as any system that supports human and machine interaction (167). The system includes software, hardware and input and output. An essential component to this chapter is interactivity, which is the communication between technology and the people that are using it, so people are able to choose what they need to communicate, what information they want, and how they want the information to be displayed. As technology advanced, the Graphical user interface was created to include scrolling bars, icons, menus, and different windows. To provide a personal example, I have recently gotten a new computer, and I can tell a major difference in this Mac as opposed to the Mac that I had in 2007. The interface is much more easy to use, and it is much easier to open icons and change various settings. It also has elements of personalization and customization, as it tailors my preferences based on how I have previously been using it, and allows me to customize the background, font, font size, and different layouts.

My computer also has an element of touch interface, which the chapter defines as a touch component that lets the user interact directly with what is on the screen by using one or more fingers. The one on mine is a touch bar that lets me control what is on the screen, which I have found much easier to use than computers where the entire screen is able to be touched. Siri is also ready to go on this computer as well, which is an example of voice interface, because I am able to command the computer to do different things with my voice.

Image result for apple touch bar


Augmented reality is another interesting topic that more people have started to talk about and explore. It is a modified view of reality, and I was interested to read more about the Google glasses, which I had never heard of. These glasses let the wearer take pictures and even use the Internet!

Image result for google glass

Navigation of the user interface is key, as it allows for the user to know how to make the computer perform actions. There are different types of navigation, broken into primary and secondary navigation. Primary organizes content according to what the user is most interested in, and secondary organizes content that is less visited by the user. An example of a primary navigator are menus, and examples of secondary navigators are tabs and footers:

Image result for primary and secondary navigation

There are also different types of menus, which can be vertical or horizontal, or accordion style. Tabs can also be used to visualize a lot of information and separate pages, as the user can switch back and forth between them. Home links allow for the user to go back to the home page of a website and breadcrumbs allow the user to find their way back to the home-page. Links can be added to the footer of a website, and it is also where you can find the Contact, About, or FAQ section of a website. Footers are used to display secondary information. Conveniently, user interface plays a huge role in organizing information for us to access easily.

Thumbnails, Carousels, pagination, and archives are all different ways to organize information as well. The most interesting of these to me is the concept of pagination, which is when you break information up to be shown in different pages. This allows for the user to preview how much content is going to be on the topic in the next pages. It is always at the end of a Google page, as seen in the iconic image below:

Image result for google pagination

Before tailoring, websites all looked the same, but now websites are personalized and customized for the user to make changes. Forms are another important aspect of using the Internet, as filling out forms electronically online is very easy and less time consuming. Some doctors offices are even switching from paper forms to all electronic! Usability and learnability are also important aspects of user interface design, and so far the Mac is the easiest computer to lean and explain to people in my opinion. Once people learn how to use a Mac, it becomes a fast favorite and preference over a PC. Efficiency and error management are also important components to me, as being able to perform tasks efficiently without having to worry about a shutdown is an important part of being a college student. Additionally, having a computer that is able to fix itself is also helpful as well, and saves time and money. Accessibility is also essential as well, so that everyone has visual, auditory, and physical access to technology. The chapter includes a great example of the iPhone, which is easy to customize in the accessibility menu based on personal needs. Having the option to customize all of these aspects, along with having a smooth functioning user interface design, are extremely vital so that people can use the product properly and efficiently!

Image result for accessibility iphone

Chapter Five: Page Layout

We should not forget the overrunning theme throughout all of the chapters, which is PLAN PLAN PLAN! Page layout is a key instance when planning will be extremely beneficial and necessary to creating a visually appealing, successful page, in which the content is displayed so that it can be easily viewed. I have never used Adobe Indesign, but have heard reviews about the software that are positive. Regardless of the software, knowing where to place certain images is a key element of page design.

logo(1)

According to the Gutenberg diagram, which came from the Gutenberg press, it is essential to have the text on a page distributed evenly. The digram slices a page into four equal parts and asserts that there is a gravitational force on a person’s eye that pushes their gaze down and to the right of the page:

Image result for gutenberg diagram

The most common type of layout, according to the chapter, is the F-Layout, which organizes the content on a page so that the left edge serves as an anchor for the eyes, and the user scans the page in bursts until they reach the bottom, with each scan becoming shorter as the viewer reaches the end. Conversely, the less popular Z-Layout is designed so that the reader reads the top part of the page and the eyes gravitate downwards diagonally across the page and then to the right as they reach the end. My personal preference when reviewing these two layouts in the chapter is the z-design, because it appears to be more simple and have less information covering the page.

Image result for f layout

There are other different ways to organize content as well. The method of chunking body copy is when the information is broken into chunks so that the visual density of text on a page is reduced. Headings can also help when distinguishing text and images on a page, because headings make it easier to scan a page and pick out important information. Or, one can use the Grid System, in which vertical and horizontal lines are used to divide information into smaller parts. A tip that the chapter mentions is using graph paper to create drafts of social media pages, so that the pages can be scaled, and then mapped and  planned out. This is another example of when it is good to plan before-hand, so that the information on the page can be well-thought out and space used in the most effective way. In the image below, it is clear that all of the content on the page has been symmetrically planned and placed strategically so as to maximize space and visual appeal. It is also an example of a grid that has different columns.
Image result for the grid system web design

Tables can also be used, and manipulating the cells when designing a table can be beneficial to plan the structure of a page. Templates are another great example, and are great for beginners to use when building a page. These can be purchased, or some can be acquired for free. There is also a difference between static and dynamic pages. Static pages use the same layout for every viewer of the page, while dynamic pages have content that changes over time depending on the individual viewer. The Facebook example mentioned in the chapter is interesting because I did not know Facebook is continuously changing deepening on who is using the site.

Fixed layouts have a height and width that is predetermined, while fluid layouts vary depending on the resolution of the device that the viewer is using to look at the page. Regardless of the methods, having a well-thought out plan before designing a page is extremely beneficial to creating one that is visually pleasing. My personal favorite method to do so from this chapter is the grid method, because it is the most detailed. All of the content of the page can be scaled to size and put on the page before hand, which can allow for the creator of the page to find errors, and also show the visual to others to get opinions of how it looks. All of these strategies are why it is always important to plan beforehand.

web-page-layoutstock-vector-hand-drawn-website-layouts-doodle-style-design-website-layout-doodle-web-page-graphic-template-3946400050546abae82ad057197f4542e0a3f2005